When we listen to a home stereo, we have ideal conditions: A quiet environment, speakers pointing to the “sweet spot” on the same axis, etc. By properly aligning the speakers, and designing a good crossover, a sweet spot can be achieved on a car with as good quality sound, staging and imaging as a high-end home stereo.
There is still one thing that is different between a car and a home stereo listening room: The background noise. There are all kinds of exterior (road noise, rain hitting the windshield, etc.) and interior (rattles) noises that draw attention away from the music in a car. To make up for the road noise, we simply turn the stereo up louder.
Even though it is impossible to eliminate the noise completely in a car. There are products that will decrease the noise floor a great deal, particularly on non-luxury cars. Reducing the noise in a car will make a big difference in the audio system’s performance and overall ride comfort.
Liners
Tar mats and similar products such as Dynamat are used to reduce resonances in metal panels. A car lined with a mat will have a much lower road noise. To add a mat liner to a car, seats, carpet, door panels, etc. have to be removed. With the help of a heat gun, and a small wallpaper roller, the material can be laid over door panels, floors, wheel wells, etc. A cheaper alternative to Dynamat, as mentioned in the rec.audio.car FAQ is a product used by roofing contractors called “Ice Guard”, which has an adhesive backing and works the same way.
Sprays
There are products such as Rockford Fosgate’s Noise Killer Blue which are sprayed to the panels. They are used in places where a liner can’t be applied such as inside doors, trunks, etc. Most of those products are applied in the same way as paint: Either sprayed or with a brush. There are two types of sprays: Some need an air compressor and a spray nozzle and the others already come in a spray bottle such as Stinger’s RoadKill.
An alternative is rubberized undercoating which can be obtained at any major car parts store. It comes in a spray can and is easy to apply. The only drawback is that it is very sticky and messy. Could be used for the inside of the doors or places where it won’t come in contact with carpet or fabric.
Expandable insulation spray foam is used in homes to seal around pipes and fill up holes in basements. In a car, it can be used in irregular surfaces where tar mats can’t be applied, such as the trunk, trunk lid, etc. To apply, clear the area from fabric, panels, etc. Once the foam dries (about four hours), cut excess off with a long knife.
Adhesive Strips
Used for home door insulation. A strip of foam with an adhesive material on one side, used to seal between the door and the door jamb to keep air from escaping the house. Apply between panels, behind license plates, etc. Quick, inexpensive and easy way to get rid of annoying rattles.
Another product that can be placed between panels to cover larger areas is carpet padding, available at any carpet store.
Damping a Door: Step by Step Instructions
A combination of three products will be used in this case: A spray noise damping material, spray rubberized undercoating, and a tar mat. This allows for maximum noise isolation.
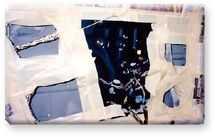 Step 1 Step 1
After carefully removing the door panel, parts not to be sprayed were protected by masking tape and paper. Parts inside the door, such as lock mechanisms, window rails and power window motor were protected using aluminum foil. |
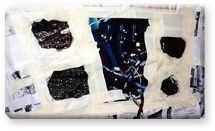 Step 2 Step 2Since doors always get wet and RoadKill is a water based product, rubberized undercoating was applied to seal it off. After letting the door dry for 24 hours, the rubberized undercoating was applied over the RoadKill Spray. On parts of the car that don’t get wet, this is not really necessary. An alternative is to apply only undercoating inside the doors. |
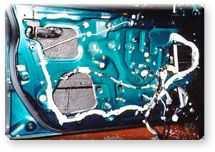 Step 3 Step 3Masking tape, paper and foil were removed. The surface of the door was cleaned to ensure good adhesion of the tar mat material. Without removing the adhesive backing, the mat was measured and cut in the approximate shape of the door. The mat was then heated with a heat gun to make it more malleable and help the adhesive stick better. |
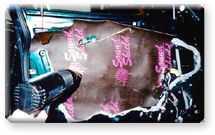 Step 4 Step 4The backing of the mat was removed to expose the adhesive. After lightly placing the mat over the door, cuts were made to accommodate wiring, and lock mechanisms that hook up to the door panel. A 1″ wallpaper roller was used to make a good bond between the mat and the door. The heat gun was used to help shape the mat to the door contours. |
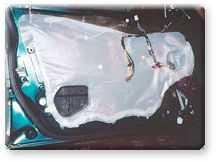 Step 5 Step 5The factory water shield was placed over the mat. This is not necessary when the mat covers the door completely, but it is better to do it this way to assure that no water gets in the door panel through holes, protecting electronic components, and giving the door a factory appearance. The controls in the door panel were connected, and the door panel was reinstalled. |